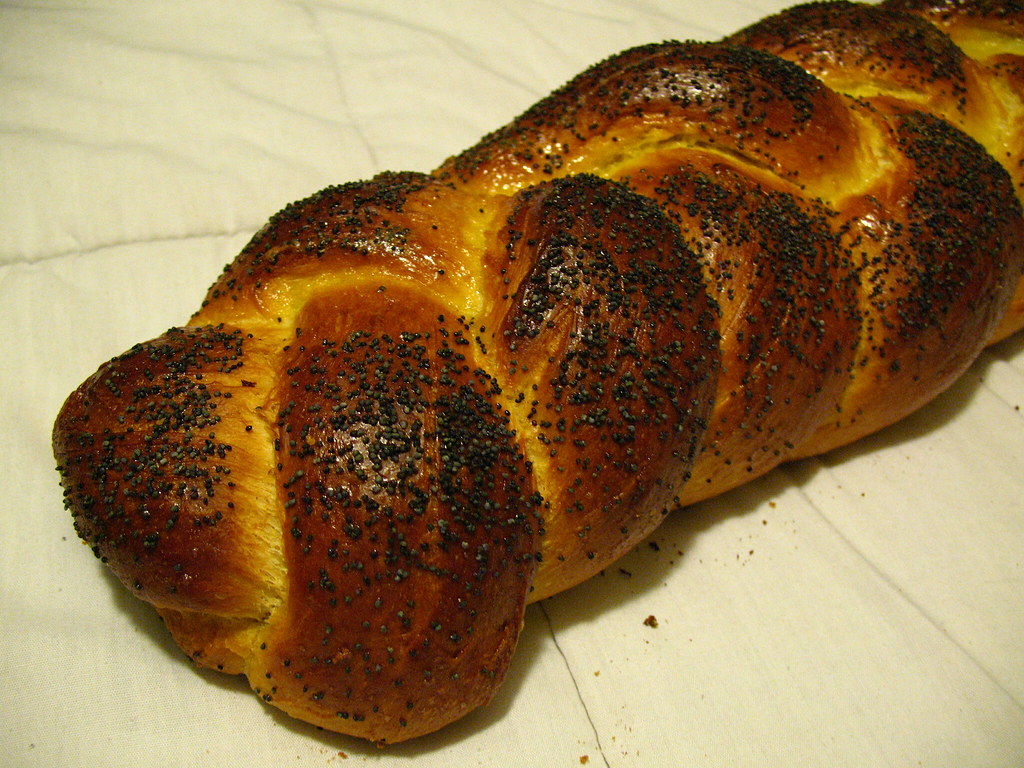
Thursday, March 13, 2008

The Better of Two Challahs

Ok so here's the recipe I think yields a much more rewarding challah, maybe with a few tweaks here and there.  The first challah is a reference point to how much better this challah is.  This is a recipe from another home baker in Hawaii whom I'm finding is pretty good at tweaking recipes for the better.  This recipe produces a well textured, light, and airy loaf.  This is because the yeast is allowed to proof in a glass before continuing as well as the dough rising three times before baking.
 
Rebecca's Challah:

Ingredients:
2 pkgs.................Dry Yeast
8 Tsp + .5 Cup........Sugar
~8 Cups................AP Flour
2.25 Cups..............Warm Water (105 - 115 degrees)
.5 Cup..................Vegetable Oil
2 Tbsp..................Kosher Salt
3........................Eggs
1 Tbsp..................Poppy Seeds

Instructions:
Prep [25 Min.]
To start this dough we need to get the yeast to react in water and begin the growth process so they will be at the optimal stage to convert the fermentable sugars and starches from the dough into CO2 when the bread rises and bakes.  This is true with all yeasted doughs but in this recipe we hasten this process by adding the yeast, 2 Tsp. sugar, and 2 Tbsp AP flour into a tall water glass and then stirring in .75 Cups of warm water.  By setting this mixture aside until it reaches the lip of the glass (in an 80-85 degree environment would be best) you are "proofing" it, or put simply proving that the yeast is ready to do its job.  So while your little yeasties are proofing measure out 4 Cups of flour into a large bowl.  Add 1.5 Cups warm water, .5 Cups vegetable oil, .5 Cups sugar, salt, and two eggs.  Mix thoroughly.  When the yeast has proofed sufficiently add it to your bowl.  Mix it in and add three more cups of flour gradually.  The dough should be shaggy and clean the sides of the bowl.

Kneading [8min.]
Push-fold-turn people.  Eight minutes of arm exercise just for you!

First Rising [1.5 - 2 hrs.]
Grease a mixing bowl and put the dough inside.  Turn once to coat the dough and keep it from crusting while it rises.  Cover with plastic wrap and stick in a warm place (80-85 degrees) until doubled in bulk.

Second Rising [1.5 hours]
Punch down the dough.  If it seems to sticky you can add almost .5 Cups to rectify this, don't over knead.  Grease the top of the dough again, cover and set back in a warm place to double.

Shaping [depends on your motor skills]
Punch down the dough again and knead to press out the bubbles.  Divide the dough in half and then in thirds.  Braid each set of three starting in the center and working outwards.  Don't forget to pinch the ends and fold under.

Third Rising [1 hour]
Place the two braided loaves on baking sheets and cover with wax paper.  If you are worried about the wax paper sticking to the dough you can lightly grease the wax paper.  These should again double in bulk.

Baking [350 degrees / 45-55 min.]
While your oven is preheating combine your remaining egg with 6 teaspoons of sugar, brush each loaf, and sprinkle on your poppy seeds.  Don't forget that these will rise in the oven, so reserve some of the glaze for halfway through the baking process.  These will bake in the oven until golden brown.  To test for doneness you can use the toothpick method inserted in a good thick spot where the dough may not have thoroughly cooked.  As you know i prefer to use my probe thermometer set to notify at just over 200 degrees.  These loaves will be fragile until cooled so be careful not to manhandle them.  Use a large spatula to get them off the baking sheet and onto a wire rack to cool.  

Wednesday, March 12, 2008

Scones are tea-riffic


Is there anything better than fresh breakfast scones filled with a thousand different flavor combinations?  Yes!  Just add a pipping hot cup of tea and someone to share it with and you will be in heaven.  These scones are serious and they mean business.  Delightfully simple to make and so damn rewarding.  You may rethink the  meaning of breakfast for these traditional recipe scones.  This is a recipe taken from an old Scottish lass named Mrs. Macnab, made famous by King Frederick II whom made several delicious trips outside Balmoral castle to get these scones.  This is her recipe, still unchanged from the 1700's.

Mrs. Macnab's Scones:
...
2 Cups AP Flour
1 Tsp. (each) Salt & Baking Soda
2 Tsp. Cream of Tartar
4.5 Tbsp. Butter (room temperature)
1 Egg (room temperature, slightly beaten)
.5 Cup Buttermilk
...
1.  Combine all dry ingredients thoroughly.
2.  Rub in the butter by hand, slowly with the thumb and first two fingers until you get a bowl of dry butter crumbs.  The more you make these the better you can tell if more butter is needed, as it sometimes is.
3.  Slowly combine the buttermilk and egg.  If the mixture sticks to your hands while mixing just use a bit of AP flour, but not to much to avoid the scones from turning out dry.
4.  At this point add any flavors or aromatics to the dough, being careful to install the ingredients without forcing them into the dough (this would be considered a form of kneading, which you don't want to do).  Some good choices for additions include sweet herbs (like dill or sage), fruit, cinnamon, maple syrup, chives, or shallots.  You can really add anything to scones because their base flavor is so neutral.  Another option is to make plain scones but you would want to up the sour factor of the buttermilk.  Any ideas on how to do that?  Let me know.
5.  DO NOT KNEAD!  Just bring the dough together well enough to be pliable.
6.  Divide into shapes that you like.  The traditional shape is a "round-edged" triangle which can be made by forming the dough into a circle and cutting out wedges.
7.  Bake at 375 degrees for just 15 minutes.  The scones should take a minimal amount of color and you can test them by taking one out of the oven and rapping it on the bottom.  The sound should be firm and slightly hollow, not as extreme as a loaf of bread would be.  My favorite way of testing is just to eat one, especially if you make several small scones because the potential waste of one scone wont be detrimental and hot scones are derlicious.  There is also the probe thermometer method which I am a fan of and as always your probe should be placed in the center of your baked good and set to notify at just above 200 degrees F.

Let these rest on a wire rack for a few minutes to firm up the insides.  You will know you were successful if the scone can be broken laterally into flakes of deliciousness.

First let us visit the origins

Here in The Kitchen we sometimes have to accept that at one time we baked shitty bread.  This being said, i urge all up and coming bread bakers to stray away from recipes called "egg braid" when all you really wanted was a sexy, velvety-smooth challah like all your Jewish mothers used to make.  This recipe produced a lifeless, tasteless, and downright disappointing doorstop of a braid.  This is the kind of bread you let your dog eat just to watch it be thrown up in a cascade of therapeutic destruction.
...
So here's the recipe!

Ingredients:
Dough:
1 Pkg.........Dry Yeast
5 Cups........AP Flour
2 Tbsp........Sugar
1.5 Tsp.......Salt
.3 Cup........Butter
1 Cup.........Tap Water
1 Pinch.......Saffron (optional in my opinion, i don't think a traditional recipe would call for it)
4...............Eggs (Use one yolk for the glaze and the remaining eggs and egg white for the batter)

Glaze:
1...............Egg Yolk
2 Tbsp.........Sugar
1 Tsp..........Cold Water
.5 Tsp.........Poppy Seeds (to sprinkle)

Instructions:
Prep. [15min.]
Using a large bowl mix yeast, 2 Cups flour, sugar, salt, and butter.  Gradually add water and beat for 2 minutes.  Add saffron and 1 egg white (reserving the yolk).  The batter will be thick.  Beat for 2 minutes.  Add the remaining flour (3 cups approx.) slowly, one cup at a time until the dough cleans the side of the bowl.

Kneading [8min.]
Knead on a floured work surface until the dough is smooth and elastic.

1st Rising [1 hour]
Return dough to the mixing bowl, which you should have prepped by cleaning and greasing it, and turn the dough to coat with grease on all sides (this prevents a crust from prematurely forming).  Cover the bowl with plastic wrap and place in a warm, draft free place (this is very vague.  if you want this process to go faster try to get a room stable at about 80-85 degrees.  If you want better development of flavor and can wait around all day then try to get a room stable at about 70-75 degrees).  You want the dough to double in bulk before preceding.

Shaping [25min.]
Punch down the dough and knead out any bubbles.  Divide the dough in half.  To braid, divide each half into three equal pieces.  With your hands roll the dough pieces into 12" lengths.  Lay three of the rolls parallel on a large floured work surface.  You want to start the braid in the center to remove as much tensile stress from the dough as possible.  When you reach the end of the dough pinch the ends securely and repeat for the other side of the braid and then repeat the entire process for the other three rolls.  If you need more instruction on how to braid anything from dough to your mom's pretty hooker hair visit: How to Braid.  Now place the two braids on a baking sheet and combine and beat together the remaining egg yolk with the other glaze ingredients and carefully brush the braids, getting every nook and cranny.  Don't forget to sprinkle with poppy seeds!  (a good hint for a total glaze is to reserve some of the mixture for halfway through the baking process.  the braid will, hopefully, rise up some and unglazed dough will be showing.  just reapply the mixture to these areas for a fuller glaze).

Second Rising [1 hour]
Don't cover the braids for the second rising.  Place both braids (still on baking sheets) at whichever room temperature you've decided to use until doubled in bulk.

Baking [400 degrees / 30min.]
Don't forget to reglaze the braids if necessary.  The braids will test done using the toothpick method, or as i always prefer with a probe thermometer set just above 200 degrees.  The braids should be golden brown.  Let this cool on wire racks until room temperature before breaking the bread.

So whomever wants to try this recipe out should let me know if it was as delicious as you'd hoped.  Maybe i missed something in my prep but i contend that this is just a poor recipe in a world full of superior challah recipes.  The smoking gun is my other challah recipe and pics found here.